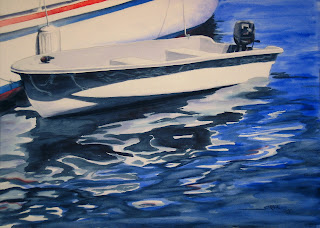
How to Paint a Boat
Here's another quick demonstration of my painting process, from start to finish.
This photo shows my drawing of a fresh fiberglass tender tied to the side of a large old wooden yacht. I've covered a few areas with masking fluid to contain my washes, and after it dried I painted the first wash of color in the water area where there will be reflections of the boats later.
Working from light to dark, I paint the water in layers, with each layer of paint a darker color or value than the last. I started with some light mixtures of violet and cobalt with a bit of ochre to get the nice grey color in the lightest areas of the water, and then layered cobalt, ult. blue, and indigo to get the progressive dark areas in the reflections.
Using that same grey that I mixed up earlier, I painted the tender a light grey color and then deepened the values in the shadow areas of the boat to give it depth and dimension.
As I worked, I deepened some of the lighter reflections in the water to match the colors and values that I used on the tender, and I darkened some of the shadow areas of the both the yacht and the tender to add to the depth of the subject.
At this point I can start adding some of the smaller details, and I paint in the trim and waterlines on the boats and refine some of the shadows.
I stepped back from the painting, and I realized that the dark values in the lower right area was competing with the subject for attention, and it was disrupting the overall composition of the painting. I washed off some of the paint from that area and corrected it. I also removed the rest of the masking fluild and painted in the bright reflections in the shadows of the tender's hull, which is the sunlight bouncing between two reflective surfaces (the water, and the hull).
And finally, using a smaller brush, I painted in the last few details and refined a few of the values to complete the painting! I'd love to know what you think -- leave me a comment and tell me your thoughts!


6 Comments:
Wonderful tutorial, thank you. How long it took you, the whole process? Love the way you did the water. I'd like to save it on my blog. Is it OK?
Hi Nikira, thanks for the comment! I worked on this painting off-and-on for about 2 days, and then I set it aside for a week before I went back and spent about an hour or two painting in the last details. I be honored to have you link to it on your blog -- thanks!
Thank you. :-)
Hi Annie
Your paintings are really beautiful. You are a true inspiration.
Keep on the good work.
Regards Jennifer, designerfeats.com
Thanks Jennifer!
I appreciated your kind way of knowledge.Great Stuff Here..hope more to come.
Post a Comment
Subscribe to Post Comments [Atom]
<< Home